Writing a Game Boy Advance Game
I spent a lot of time as a kid playing (generally, pretty terrible) games on my Game Boy. Having never written code for anything other than 'regular' general purpose computers before, I've been wondering recently: how easy is it to write a Game Boy (Advance) game?
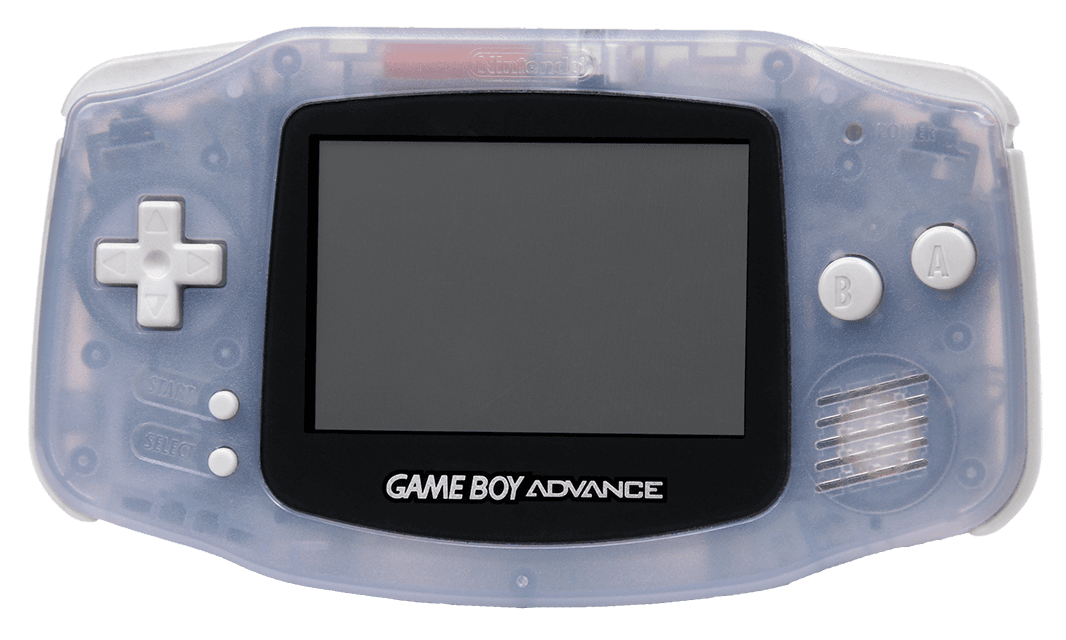
For those unfamiliar, the Game Boy Advance (GBA) was a popular handheld games console produced by Nintendo (pictured below). This thing is kitted out with a 240x160 (3:2) 15-bit colour LCD display, along with six face buttons and a directional pad for input.
On the inside, the GBA's CPU contains a 32-bit ARM7tdmi ARMv4T RISC core (operating at 16.78 MHz). Along with regular 32-bit ARM instructions, this chip can execute 16-bit Thumb instructions. For those unfamiliar, the Thumb instruction set is a 16-bit encoding for some of the most common 32-bit ARM instructions, and can be used to increase code density.
In terms of memory, the device has 130 KB of embedded memory within the CPU (96 KB of which is used for VRAM, 32 KB of which is for general usage, and 2 KB of which are used elsewhere), and 256 KB of RAM external to the CPU. The system also has 16 KB of System ROM, which is used to store the BIOS. There are also some additional details in all this regarding backwards compatibility of the Game Boy Advance with the Game Boy Colour, but we're not going to discuss them here.
Along with all this internal memory, the GBA is typically loaded with some form of game cartridge. These typically consist of some ROM (to store instructions, read-only data, etc.), and some form of mutable storage (typically SRAM, Flash Memory, or EEPROM). As the Game Pak ROM is connected via a 16-bit wide bus, it makes sense to use 16-bit Thumb instructions rather than 32-bit ARM instructions most of the time in game code.

All of the memory sections we've discussed, along with I/O hardware registers (to control graphics, sound, DMA, etc.), are mapped into memory, giving a memory layout something like the following:
0x00000000 - 0x00003FFF- 16 KB System ROM (executable, but not readable)0x02000000 - 0x02030000- 256 KB EWRAM (general purpose RAM external to the CPU)0x03000000 - 0x03007FFF- 32 KB IWRAM (general purpose RAM internal to the CPU)0x04000000 - 0x040003FF- I/O Registers0x05000000 - 0x050003FF- 1 KB Colour Palette RAM0x06000000 - 0x06017FFF- 96 KB VRAM (Video RAM)0x07000000 - 0x070003FF- 1 KB OAM RAM (Object Attribute Memory — discussed later)0x08000000 - 0x????????- Game Pak ROM (0 to 32 MB)0x0E000000 - 0x????????- Game Pak RAM
These sections have varying bus widths and read/write widths (e.g. you can't write individual bytes into VRAM!), and some sections are mirrored in memory at multiple points. There is also some extra complexity to this in reality, but this is the main structure that we'll need to build a basic GBA game.
With this knowledge of the memory structure of the device, the plan to make a “Hello, World!” GBA ROM is as follows: write some Thumb code for our Game Pak ROM which sets display parameters in I/O registers as appropriate for some particular display mode, and then write some graphical data into VRAM that we want to display. With some of the theory about the device out of the way, let's actually try and build something.
Setting Up A Development Environment
To begin executing our plan to build a GBA ROM, we need to know a bit about the ROM format. Without going too far into the details, GBA ROMs begin with a standard header. This should start with a four byte ARM instruction to branch to the start address of our program, followed by some magic bytes representing the Nintendo logo.
Additionally, in this header there is some data about the game (its title, etc.), and a 'check' value for this data. We will need to ensure that the header is perfectly correct if we want our ROM to execute properly (particularly if we're aiming to execute on an actual device rather than an emulator).
Thankfully, most of the details of ROM creation can be handled by a good toolchain. I use the devkitARM toolchain myself (one of the devkitPro toolchains, based on the GCC toolchain), which makes the process extremely easy. Essentially, once the toolchain is set up, we can turn some C code into a GBA ROM in four steps:
- Cross-compile our C code to Thumb instructions for the GBA's CPU, creating a Thumb object file with our ROM code.
- Link our object file into an executable using a specific 'specs' file to control the behaviour of the linking. Typically the specs file includes a link script (to specify segment locations [most mutable data will get stored in IWRAM, 'const' data in ROM, etc.] and alignments etc. for correct compilation for the GBA), and some other object files (usually, a standard ROM header, startup routines, program initialization and termination code, etc.).
- Strip our executable file of information we don't need (executable header, symbol and relocation information, etc.), to get a near-complete ROM file.
- Run a utility on the ROM file from the previous step to fix its header (ensure that the Nintendo logo data in the header is correct, set any 'check' values as appropriate, etc.)
With the version of the toolchain I have on my machine running macOS, I can run the following commands (providing I have /opt/devkitpro/devkitARM/bin in my PATH environment variable) to compile a C file into a GBA ROM (as we described above):
arm-none-eabi-gcc -c main.c -mthumb-interwork -mthumb -O2 -o main.oarm-none-eabi-gcc main.o -mthumb-interwork -mthumb -specs=gba.specs -o main.elfarm-none-eabi-objcopy -v -O binary main.elf main.gbagbafix main.gba
There are also some additional flags you might want to pass in for the first step (the compilation) — I'd recommend -fno-strict-aliasing, for example, as we'll be dealing with raw memory and pointers a lot and don't really want C's strict aliasing rule to bite us. You might also find it beneficial to write a Makefile or shell script with these commands to make ROM compilation easier — these details seem a little unnecessary to include in this post though.
With a process for ROM compilation from C established, let's try and test it out. To throw a bone to any readers starting to drift off from all the theory, let's look at the code for our "Hello, World" GBA ROM first, and then discuss it afterwards.
int main(void)
{
	// Write into the I/O registers, setting video display parameters.
	volatile unsigned char *ioram = (unsigned char *)0x04000000;
	ioram[0] = 0x03; // Use video mode 3 (in BG2, a 16bpp bitmap in VRAM)
	ioram[1] = 0x04; // Enable BG2 (BG0 = 1, BG1 = 2, BG2 = 4, ...)

	// Write pixel colours into VRAM
	volatile unsigned short *vram = (unsigned short *)0x06000000;
	vram[80*240 + 115] = 0x001F; // X = 115, Y = 80, C = 000000000011111 = R
	vram[80*240 + 120] = 0x03E0; // X = 120, Y = 80, C = 000001111100000 = G
	vram[80*240 + 125] = 0x7C00; // X = 125, Y = 80, C = 111110000000000 = B

	// Wait forever
	while(1);

	return 0;
}
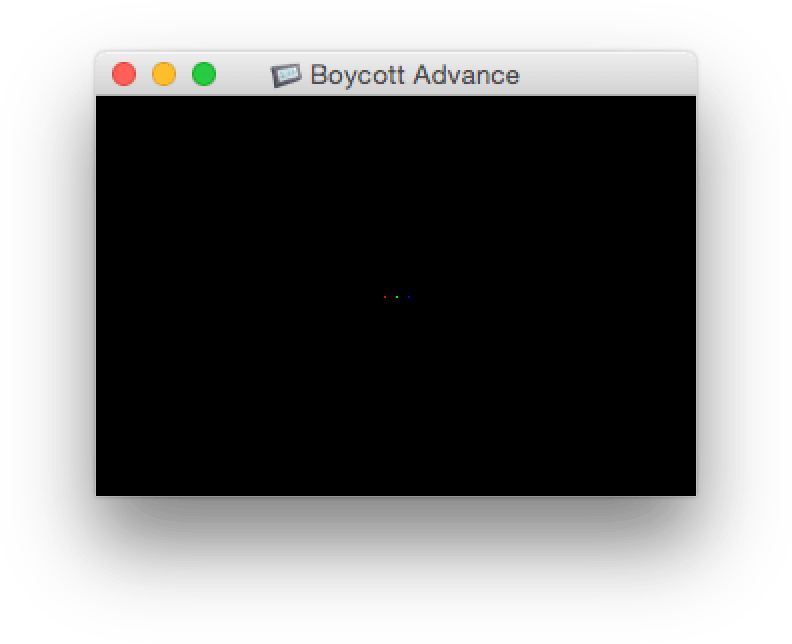
The code above is relatively simple, and should result in a horizontal set of three pixels being drawn in the middle of the GBA screen — one red, one green, and one blue:
Now, time to explain the code. Firstly, we write some display parameters to the memory mapped I/O registers — in particular, the first 16 bits of this memory is a display control register (often called DISPCNT). The first three bits of this register indicate the video mode, and the 11th bit indicates whether background #2 (BG2) is enabled or not — thus, by writing the values we do, we set the video mode to mode 3, and enable BG2.
Why do we need to do this? Well, first off the video mode. It turns out that video mode 3 is a mode in which we can write bitmap data into VRAM, and BG2 will display this bitmap (hence, why we also want to enable BG2). You might also be wondering why I've chosen to use video mode 3 rather than another video mode — the reason for this is that video modes 0 to 2 are much more difficult to explain (though we'll be using them later).
As I mentioned earlier, the LCD on the GBA can display 15-bit colours. Therefore, we can express GBA colours using a 15-bit long colour format — for data alignment reasons though, the GBA uses a 16-bit colour format. Specifically, the format is as follows: ?BBBBBGGGGGRRRRR. So that's an unused bit, followed by five bits of blue, five bits of green, and then five bits of red.
Using this format, and with knowledge of how video mode 3 treats VRAM as a 240x160 bitmap, our "Hello, World" ROM simply writes some colour values at specific pixel offsets (e.g. as we're assuming that unsigned short is 16-bits in size, vram[80*240 + 120] skips 80 horizontal lines of 240 pixels, and then accesses the middle pixel on that horizontal line). Note, by the way, that all the memory accesses for interfacing with hardware in the code occur through volatile pointers — this prevents the compiler optimising out what it might think are useless memory operations.
Writing a pong-esque game
With the basics out of the way, let's try and build something a little more interesting. We're still going to hack the solution together rather than building a bunch of project infrastructure and helper functions, but we'll make use of some more advanced features of the GBA's graphics rendering. In particular, we'll depart from drawing using the bitmap video modes.
While drawing in the GBA's bitmap video modes (modes 3, 4, and 5) is very easy, for many games it's not really practical. Our 240x160 bitmap itself takes up the majority of VRAM just to fill the screen once, and pushing around so many pixels every frame can be computationally expensive too (we might not be able to afford this we're aiming to render our game at a reasonable framerate). Thus, we have video modes 0, 1, and 2.
There is a fair amount of complexity wrapped up in these modes, so we're only going to attempt to run through the most important pieces. Instead of operating on individual pixels, the GBA's first three video modes operate on tiles. A tile is an 8x8 bitmap. These exist in 4 and 8 bits per pixel (bpp) variants, but here we'll be using the 4bpp type — thus, the tiles we'll be using have a size of 32 bytes (8 * 8 * 4 = 256 bits).
If you're wondering how we're supposed to fit 15-bit colour values for each pixel in 4 (or 8) bits, we don't. Instead of referring directly to colours, the pixel values in tiles refer to colours within a particular colour palette. We can define colour palettes by writing colour values into the colour palette memory we mentioned earlier (0x05000000). This can store 512 sets of 16 bits (hence, 512 colours), which essentially means that we can store 2 palettes of 256 colours, or 32 palettes of 16 colours.
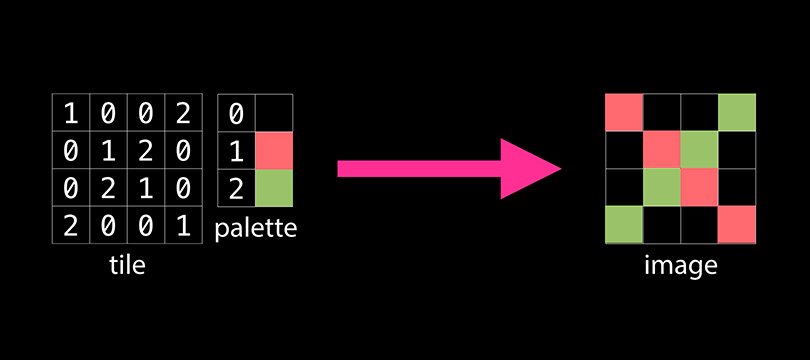
In the case of our 4bpp 8x8 tile bitmaps, we'll treat the colour palette memory as 32 palettes of 16 colours. This way, we can use our four bits for each pixel to specify the colour index (within some palette of 16 colours) for this pixel. When using tile-based video modes, tiles are sectioned in VRAM into 'tile blocks' or 'charblocks'. Each tile block is 16 KB in size, so we can fit 512 4bpp tiles in a tile block, and 6 tile blocks in VRAM.
The theoretical set of 6 tile blocks in VRAM are split into two groups — the first four (0–3) can be used for backgrounds, and the last two (4 and 5) can be used for sprites. Similarly, the 32 palettes of 16 colours in palette memory are split into 16 palettes for backgrounds, and 16 palettes for sprites. Since we're not going to deal with backgrounds in our game, we're only interested in tile blocks 4 and 5 in VRAM (i.e. those starting at addresses 0x6010000 and 0x6014000), and colour palette block 1 (address 0x5000200). So, say that we've loaded some tiles into tile block 4 — what can we do with this? Well, the whole point of us dealing with tiles in this case is to create sprites which use them.
A sprite, in Computer Graphics, is a 2D image that fits within a larger scene. It turns out that the GBA has hardware that can render 'objects' (i.e. sprites) for you, and these objects get rendered such that the object can move around without leaving a trail of modified pixels. Providing that objects are enabled (bit 13 in the display control I/O register is set), an object can be created from a particular set of tiles by writing the object's attributes into the GBA's Object Attribute Memory (OAM). In this case, as we're looking to make a 'pong'-esque game, we'll probably want at least two sprites: a paddle, and a ball. Any particular 'object' has three sets of 16-bit attributes:
- Attribute 0: includes, among other things, the y coordinate of the object, the shape of the object, and the colour mode of the object's tiles (4bpp or 8bpp).
- Attribute 1: includes, among other things, the x coordinate of the object, and the size of the object.
- Attribute 2: includes, among other things, the base tile index of the object, and the colour palette the object should use (when in 4bpp mode).
The specifics of these values can be viewed elsewhere, but essentially, the y coordinates are the lowest 8 bits of attribute 0, the x coordinates are the lowest 9 bits of attribute 1, and the colour mode defaults to 4bpp (i.e. zero = 4bpp).
The 'shape' and 'size' bits of an object define its form, and different combinations of these four bits result in different final shapes (entities more complex than this system are made up of multiple smaller objects). If an object should be larger than one tile in size, it will use different tiles for it's appearance depending on the mapping mode that is set (the 7th bit of the display control I/O register). It's easiest for us to use the 1D mapping mode, so if an object is bigger than one tile, it will fill itself using the tiles that follow its 'base tile' in memory.
With sprites explained, we're almost ready to start building. We want to use video mode 0 for this program, in which BG0–BG3 operate in 'regular' mode (we can't perform affine transformations on them). Now we just need to feed the input from the GBA's directional pad into some primitive physics code, put that all inside some sort of game loop, and we have ourselves a game!
The last pieces of this puzzle are both in I/O registers. The input state of the device can simply be read from the KEYINPUT I/O register (0x04000130), and we can use the particulars of how this is laid out to create masks on this state to determine whether particular keys have been pressed. As for the game loop... unfortunately, this requires one last piece of theory.
A typical game loop consists of a draw period, and an update period — in this case, we can't just choose when these occur ourselves though. If we decide to change what we want to display when the Game Boy is half way through drawing an object, we might get screen tearing (as half of the object was drawn with one set of data, and the other half with another). As a result, we need some way to synchronise our drawing and updating with the GBA's display refresh cycle.
The device gives us a little time to update after every horizontal line (or 'scanline') that it draws, but gives us even more time (around 5ms) after it's finished drawing to the whole screen. In this case, we'll just use the time available after drawing to the entire screen to do our updates — this period is called a 'V-Blank' (as opposed to a 'V-Draw', when the screen is still being drawn to vertically).
To check how far the device has drawn vertically at current, we can check the 8 bit value in the VCOUNT I/O register (at 0x04000006), which continues increasing during the V-Blank as if scanlines were still being drawn (thus, has a range from 0 to to 227). If the count is greater than or equal to 160, we're in a V-Blank. Thus, if we wait for a V-Draw to end before we begin the 'update' stage of our game loop, we have a primitive form of synchronisation.
With this synchronisation, we finally have enough information to build our game. In this case, I've chosen to build a single-player pong-esque game (with extremely primitive physics), the commented source code of which follows.
#define SCREEN_WIDTH  240
#define SCREEN_HEIGHT 160

#define MEM_IO   0x04000000
#define MEM_PAL  0x05000000
#define MEM_VRAM 0x06000000
#define MEM_OAM  0x07000000

#define REG_DISPLAY        (*((volatile uint32 *)(MEM_IO)))
#define REG_DISPLAY_VCOUNT (*((volatile uint32 *)(MEM_IO + 0x0006)))
#define REG_KEY_INPUT      (*((volatile uint32 *)(MEM_IO + 0x0130)))

#define KEY_UP   0x0040
#define KEY_DOWN 0x0080
#define KEY_ANY  0x03FF

#define OBJECT_ATTR0_Y_MASK 0x0FF
#define OBJECT_ATTR1_X_MASK 0x1FF

typedef unsigned char  uint8;
typedef unsigned short uint16;
typedef unsigned int   uint32;
typedef uint16 rgb15;
typedef struct obj_attrs {
	uint16 attr0;
	uint16 attr1;
	uint16 attr2;
	uint16 pad;
} __attribute__((packed, aligned(4))) obj_attrs;
typedef uint32    tile_4bpp[8];
typedef tile_4bpp tile_block[512];

#define oam_mem            ((volatile obj_attrs *)MEM_OAM)
#define tile_mem           ((volatile tile_block *)MEM_VRAM)
#define object_palette_mem ((volatile rgb15 *)(MEM_PAL + 0x200))

// Form a 16-bit BGR GBA colour from three component values
static inline rgb15 RGB15(int r, int g, int b)
{
	return r | (g << 5) | (b << 10);
}

// Set the position of an object to specified x and y coordinates
static inline void set_object_position(volatile obj_attrs *object, int x,
                                       int y)
{
	object->attr0 = (object->attr0 & ~OBJECT_ATTR0_Y_MASK) |
	                (y & OBJECT_ATTR0_Y_MASK);
	object->attr1 = (object->attr1 & ~OBJECT_ATTR1_X_MASK) |
	                (x & OBJECT_ATTR1_X_MASK);
}

// Clamp 'value' in the range 'min' to 'max' (inclusive)
static inline int clamp(int value, int min, int max)
{
	return (value < min ? min
	                    : (value > max ? max : value));
}

int main(void)
{
	// Write the tiles for our sprites into the fourth tile block in VRAM.
	// Four tiles for an 8x32 paddle sprite, and one tile for an 8x8 ball
	// sprite. Using 4bpp, 0x1111 is four pixels of colour index 1, and
	// 0x2222 is four pixels of colour index 2.
	//
	// NOTE: We're using our own memory writing code here to avoid the
	// byte-granular writes that something like 'memset' might make (GBA
	// VRAM doesn't support byte-granular writes).
	volatile uint16 *paddle_tile_mem = (uint16 *)tile_mem[4][1];
	volatile uint16 *ball_tile_mem   = (uint16 *)tile_mem[4][5];
	for (int i = 0; i < 4 * (sizeof(tile_4bpp) / 2); ++i)
		paddle_tile_mem[i] = 0x1111; // 0b_0001_0001_0001_0001
	for (int i = 0; i < (sizeof(tile_4bpp) / 2); ++i)
		ball_tile_mem[i] = 0x2222;   // 0b_0002_0002_0002_0002

	// Write the colour palette for our sprites into the first palette of
	// 16 colours in colour palette memory (this palette has index 0)
	object_palette_mem[1] = RGB15(0x1F, 0x1F, 0x1F); // White
	object_palette_mem[2] = RGB15(0x1F, 0x00, 0x1F); // Magenta

	// Create our sprites by writing their object attributes into OAM
	// memory
	volatile obj_attrs *paddle_attrs = &oam_mem[0];
	paddle_attrs->attr0 = 0x8000; // 4bpp tiles, TALL shape
	paddle_attrs->attr1 = 0x4000; // 8x32 size when using the TALL shape
	paddle_attrs->attr2 = 1;      // Start at the first tile in tile
	                              // block four, use color palette zero
	volatile obj_attrs *ball_attrs = &oam_mem[1];
	ball_attrs->attr0 = 0; // 4bpp tiles, SQUARE shape
	ball_attrs->attr1 = 0; // 8x8 size when using the SQUARE shape
	ball_attrs->attr2 = 5; // Start at the fifth tile in tile block four,
	                       // use color palette zero

	// Initialize variables to keep track of the state of the paddle and
	// ball, and set their initial positions (by modifying their
	// attributes in OAM)
	const int player_width = 8,
	          player_height = 32;
	const int ball_width = 8,
	          ball_height = 8;
	int player_velocity = 2;
	int ball_velocity_x = 2,
	    ball_velocity_y = 1;
	int player_x = 5,
	    player_y = 96;
	int ball_x = 22,
	    ball_y = 96;
	set_object_position(paddle_attrs, player_x, player_y);
	set_object_position(ball_attrs, ball_x, ball_y);

	// Set the display parameters to enable objects, and use a 1D
	// object->tile mapping
	REG_DISPLAY = 0x1000 | 0x0040;

	// The main game loop
	uint32 key_states = 0;
	while (1) {
		// Skip past the rest of any current V-Blank, then skip past
		// the V-Draw
		while(REG_DISPLAY_VCOUNT >= 160);
		while(REG_DISPLAY_VCOUNT <  160);

		// Get current key states (REG_KEY_INPUT stores the states
		// inverted)
		key_states = ~REG_KEY_INPUT & KEY_ANY;

		// Note that our physics update is tied to the framerate,
		// which isn't generally speaking a good idea. Also, this is
		// really terrible physics and collision handling code.
		int player_max_clamp_y = SCREEN_HEIGHT - player_height;
		if (key_states & KEY_UP)
			player_y = clamp(player_y - player_velocity, 0,
			                 player_max_clamp_y);
		if (key_states & KEY_DOWN)
			player_y = clamp(player_y + player_velocity, 0,
			                 player_max_clamp_y);
		if (key_states & KEY_UP || key_states & KEY_DOWN)
			set_object_position(paddle_attrs, player_x, player_y);

		int ball_max_clamp_x = SCREEN_WIDTH  - ball_width,
		    ball_max_clamp_y = SCREEN_HEIGHT - ball_height;
		if ((ball_x >= player_x &&
		     ball_x <= player_x + player_width) &&
		    (ball_y >= player_y &&
		     ball_y <= player_y + player_height)) {
			ball_x = player_x + player_width;
			ball_velocity_x = -ball_velocity_x;
		} else {
			if (ball_x == 0 || ball_x == ball_max_clamp_x)
				ball_velocity_x = -ball_velocity_x;
			if (ball_y == 0 || ball_y == ball_max_clamp_y)
				ball_velocity_y = -ball_velocity_y;
		}

		ball_x = clamp(ball_x + ball_velocity_x, 0, ball_max_clamp_x);
		ball_y = clamp(ball_y + ball_velocity_y, 0, ball_max_clamp_y);
		set_object_position(ball_attrs, ball_x, ball_y);
	}

	return 0;
}
And there we have it, our basic game is complete! Would it work on a real Game Boy Advance? Uhh, maybe. If I've made no mistakes, it should work properly, but it's entirely possible that I've messed up somewhere along the line.
Conclusion
This post turned out to be a lot longer than I expected. There's a lot more to GBA development than is detailed in this post too. Like any platform, it has its interesting features and its quirks. If you'd like to know more about GBA development, or about any of the device specifics in this article — I found the following resources invaluable: Nintendo's AGB Programming Manual, GBATEK, CowBiteSpec, Tonc.